
As a new mom, naturally my phone is filled almost entirely with photos of my baby’s first year of life. Every time she smiles, wears a cute outfit or has another first, I’m whipping out my phone to capture the moment.
And like many parents, I don’t want those special moments to only live on my phone. Which is what led me to creating my baby photo book album!
I’ve been a fan of photo books for years. I’ve made photo books for my wedding, the year we lived abroad in Prague, the first year I was dating my husband (cute, right?), and pretty much every trip I’ve ever been on.
But with my baby photo book, there was extra pressure to get it just right. This isn’t just a book for me but one I’ll show to friends and family members and eventually pass down to my daughter.
I knew I wanted the creative ability to add in my own photos and text, but I didn’t want to completely start from scratch. Luckily one of my go-to photo book companies, Mixbook, had the perfect combo of ready-made themes and the ability to customize them.
So below I’m walking you through exactly how I designed my baby photo book album, from choosing a theme and selecting photos to adding text, editing the design and receiving my book in the mail.
Plus – because us new parents have enough things to spend money on – I have an incredible up to 50% off Mixbook discount code for you to order a photo book of your own!
Disclosure: This post is sponsored by Mixbook; all opinions are my own. Some of the links below are affiliate links, meaning if you click through and make a purchase, I will earn a small commission at no additional cost to you. Thanks to you and Mixbook for your support!
Why create a DIY baby photo book album instead of a traditional baby book?

The tradition of keeping a baby book to record all of your little one’s milestones has been around for ages.
Our parents and even their parents’ generation often kept little books to mark down baby’s birthweight, glue in a photo, and maybe even keep a lock of hair from their first haircut.
I actually received one of these traditional baby books while I was pregnant. I love the idea of keeping a record of all of Baby C’s milestones but immediately upon flipping through the book, I knew it wouldn’t be for me.
For one, traditional baby books are restrictive. They’re fill-in-the-blank style, meaning you have to answer the questions they ask. And you only get so much space to write your response.
There were certain things I didn’t care about, like recording my child’s height and weight each month. And other things, like her birth story, that I wanted more than three lines to write.

Traditional books can also be a lot of work. Not only do you have to keep up with all those questions (god forbid you forget to measure your kid in time!), but you also have to print out your photos and tape or glue them into the book.
So instead of filling out a traditional baby book, I decided to make my own.
By going the DIY route, I had the freedom to decide what information I wanted to record. I thought it would be much nicer to tell little stories for each month of Baby C’s life, rather than just jotting down her stats.
I could also easily drag and drop photos from my computer, rather than going to a store to print them out and then paste them in. And I could add as many or as few photos as I wanted by tweaking my Mixbook design.
I was able to come back to my baby photo book, working on it over many months and revising as I went. I wasn’t committed to anything since I could simply delete any text or photo I no longer wanted – which isn’t the case with a traditional book you write in with pen.

I had the ease of working on my baby book digitally but will still get to enjoy a physical copy with the printed book, rather than leaving all of my memories stuck on my phone or computer.
Plus, because I designed my baby book online, I’m able to make copies, something you can’t do with a traditional baby book unless you want to rewrite the whole thing.
I can already see my mother-in-law asking for a copy for Christmas – so a baby photo book also makes a great gift!
Up to 50% off Mixbook coupon
The only thing better than creating your own unique baby photo book is ordering that book on sale!
Use my Mixbook discount code MIXTEA to get up to 50% off, plus free shipping:
How I created my baby photo book on Mixbook
Step 1) Start with a theme

Usually when I create my photo books, I like to start from scratch with blank pages. But for this baby book, I wanted a little more direction.
Luckily, Mixbook has a ton of themes and designs specifically for baby photo books. You can click on each one to preview the design, flipping through a photo book to really get a sense of what yours might look like.
Side note: Not only does Mixbook offer designs for baby photo books, first year albums and pregnancy journeys, but they also have themes for board books!
You can make your child their own family tree board book or alphabet board book featuring their own photos, but with all the design work done for you. I love that! Definitely something I want to do for Baby C in the future.
Okay, back to my baby book!

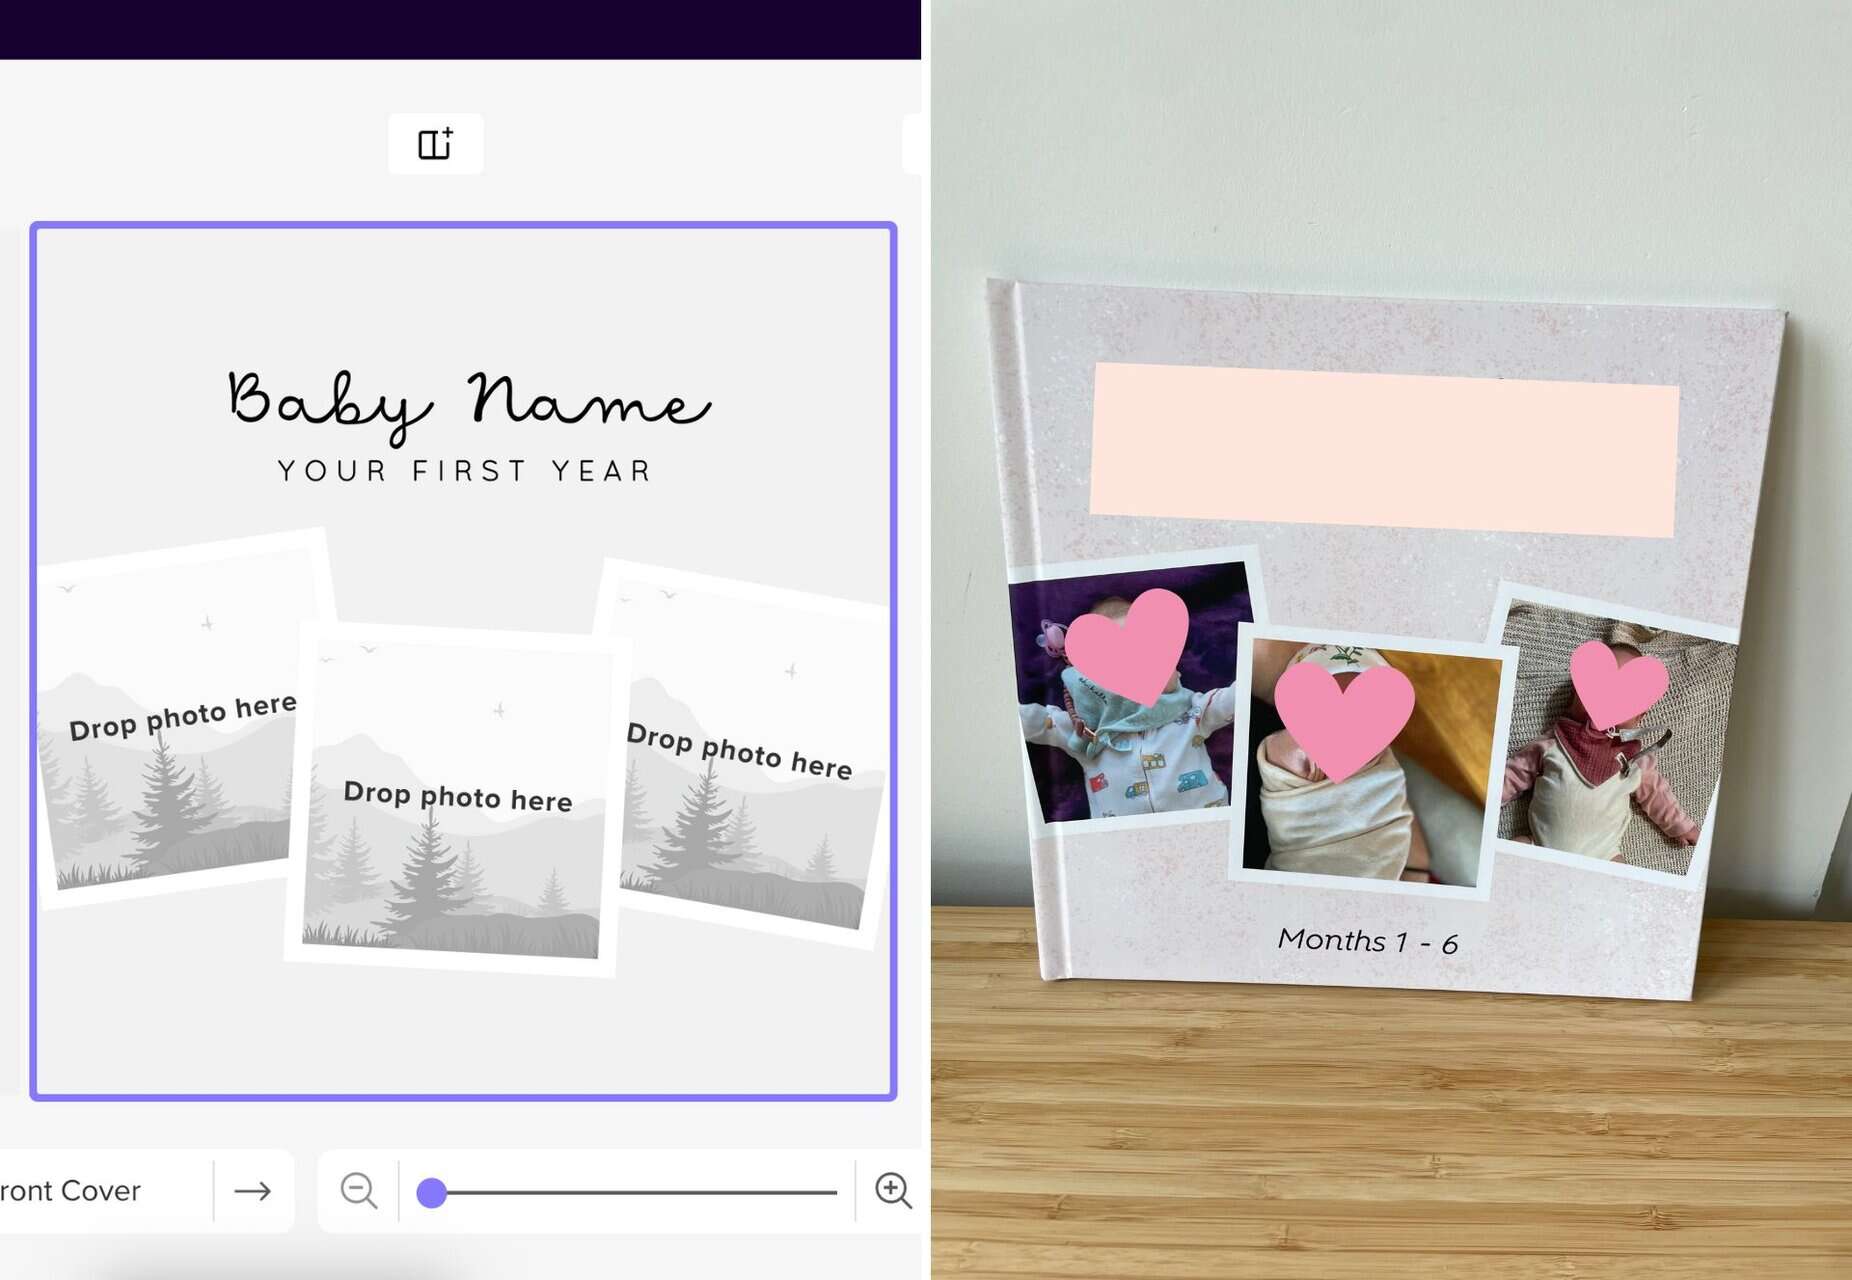
After checking out a few themes, I went with Baby’s Monthly First Year. I like that this one was more plain and simple but with cute little graphics and nice fonts.
Because I usually design my books from the Blank Canvas theme and prefer the more minimalist look, I wanted something similar for this baby book.
I find that photos pop more on a simple white background, rather than backgrounds that are more colourful and patterned. However, those ones are very cute!
The nice thing is that you can always change your mind. You can start your book with one theme and switch if you don’t like how it’s turning out.
You can also tweak the design (more on that in the next step) or combine elements of a few different themes into your own unique book.
Step 2) Tweak the design

I was pretty happy with the overall look of Baby’s Monthly First Year. I especially loved the cover design, something I wouldn’t have thought to do myself.
But the nice thing about starting with a theme is you can still tweak it to be exactly what you want. You’re not stuck with any elements that you don’t like.
So for me, while I thought all of the little cartoons were cute, there were a few too many for my taste. So I simply removed any extra ones.
I also was able to move the graphics and text around the page to better suit the layout of photos that I wanted.

And speaking of photos, I added in some extra photo pages. So rather than having every new spread (a spread is a 2-page layout, like you see when you open a book up) be a new month, I added an extra page of photos in between.
As a first time mom, I was having a real hard time cutting down the photos! In fact, this baby book is actually only of Baby C’s first six months – I’m going to make a whole separate book for months 6-12.
I also played around with some of the font choices and added in some bigger blocks of text, such as Baby C’s birth story, which basically took up its own page.
And I added some additional pages at the beginning of the book for our ultrasound photos, and memories from our baby shower and babymoon.
Step 3) Add text
 Original theme page for 5 Months
  My tweaks on the 5 Month design, plus the story I added in
I decided to stick with the month by month format from the original theme, other than adding in my extra pre-birth pages at the beginning.
The design leant itself well to the story I wanted to tell – namely, I wanted to write little recaps of each month of Baby C’s life rather than simply listing stats (like her height and weight) or just having a title saying how old she was.
To me, this was one of the big pluses of designing my own baby photo book. I wasn’t stuck answering questions I didn’t care about. And instead of making it just a traditional photo album, I was able to weave in some stories.
I think the little stories are going to make the book that much more special for us, our families and eventually for Baby C when she’s old enough to read it.

I did include some stats at the beginning of the book, such as her time and date of birth. And I continued using the monthly titles throughout so the book has distinct “chapters” based on her age.
It was interesting adding longer text blocks to this book as I usually add very minimal or no text to my photo books.
I only ever add titles to share a location, like naming the French city we were in when I made my South of France Mixbook. I don’t usually write up little stories as I prefer to have more room for photos.
But especially now that we’re travelling with Baby C, I like the idea of making room for more text in my photo books. It’s a great way to give the photos more context and make a photo book that much more special when you look back on it in the years to come.
Step 4) Add photos

After choosing my theme, tweaking it to my liking and adding my text blocks, I was finally ready to add in my photos.
I could have done the photos first before the text, but I actually found it very helpful to write up my little monthly recaps first. That way, I could focus on adding photos that related to the text.
This really helped me narrow things down as I’ve taken so many photos since Baby C was born. I could easily fill dozens of photo books, so having some guidance was very useful.
Even with my monthly recap as a guide, it was still hard to sort through all of my photos. To stay organized, I designed one month at a time, only uploading photos that were from that timeframe.
Within Mixbook Studio, I could easily sort my photos, hide ones I had already used and delete ones I no longer needed. I could also change the size of the photos in my library to easily see what I was working with.
When I first started making photo books about a decade ago, I would have such a hard time culling photos that I ended up squeezing tons of photos onto each page.
And while that can look cool, I’ve learned that less is more. It’s a lot easier to appreciate your photos when you can actually see them and not have to squint to make them out!
I try to take my inspiration from professionally designed photo albums and the themes on Mixbook. Sometimes having just one or two photos on a page offers the most impact.

It’s a balancing act between narrowing down which photos I want without cutting any of my favourite memories.
I try not to add too many photos to a single page but also not go too far in the other direction where I only have one photo per page and then need to add a bunch of extra pages!
Once I finally figured out which photos I wanted for each month, I then went through the process of arranging them on the page. I usually have a loose idea of the kind of photo layout I want on the page and will slot in my images accordingly.
For example, if I decide that I want a 4-photo layout, I’ll go through the options on Mixbook and pick the one that best works with my photos.
Do I need more horizontal or more vertical images? Do I want them to all be the same size or should there be a hero image?
 For example, this 4-photo layout called for two vertical and two more horizontal images
I then drag the photos onto the layout and rearrange them as needed. I may swap one photo with another, usually so I don’t have photos that look similar right next to each other.
Then it’s the fine tuning of positioning each photo just right. I may zoom in on a photo, crop it, or drag it up/down or right/left. I may even find that a photo needs to be cut completely or a new photo should be added in.
I can admit that I get pretty obsessive over this part of making my photo books. Especially for my child’s baby book, I want to get it just right!
Step 5) Edit and order!
 Ordering my baby book – peep the huge discount I got thanks to my MIXTEA code!
Before I placed my order for my baby photo book, I wanted to make sure I was 110% happy with it.
The first thing I did was a thorough review of the book. I started with going page by page, checking each photo and rereading my text to check for typos. Then I looked at the all-page view so I could see all of my pages at a glance.
Finally, I put the book into Mixbook’s preview mode and experienced what it would be like to actually flip through the pages. This is always the best way for me to spot anything I want to change.
For my baby book, I not only wanted to make sure that every photo looked good and all of my text was error-free, but I also wanted to make sure there was equal representation of Baby C with both me and her dad, as well as her grandparents.
Another thing I prefer is to not use the same photo layout back to back, so I check for that during my review too.
 The final version of this page in Mixbook Studio
  And the page in real life in my printed baby book!
Once I’d taken a look at the book from all angles, I then sent it to my husband, Colin, for his opinion. You can easily do this right through the Mixbook Studio by clicking the Share button and allowing someone else to edit, view or order your project.
Colin was very impressed by what I had put together, which is always nice to hear. And importantly, he caught an error in one of my text blocks, so I was able to fix that before ordering.
It was finally time to order!
After clicking the Order button, you’re able to make the final selections for your book such as the cover type, page type and size. You’ll be able to see how these decisions affect your final price as your order total changes on the sidebar.
This is also where you can enter your discount code, so don’t forget to do that!
Get up to 50% off your next Mixbook + free shipping with my code MIXTEA
I went with a 10×10″ Deluxe Square Matte Premium Lustre Hardcover Photo Book for Baby C’s album.
I’ve tried softcover, hardcover and lay flat books from Mixbook and they have all been incredible quality. You can check out my complete Mixbook review here.
Because I know this baby book is a special one we’ll keep forever, I opted for a hardcover and a slightly larger size (10×10″ instead of 8.5×8.5″). As soon as I opened it up and flipped through the pages, I knew I had made the right choice!
Wrapping up: My top 5 tips for creating a baby photo book album

I hope you’re excited to put together your own Mixbook baby photo book (don’t forget to use my discount code MIXTEA!).
Before you start creating, here are my top five tips for designing your baby book:
1. If starting from scratch is overwhelming, choose a theme.
If the idea of staring at a blank page and trying to turn that into a beautifully designed baby book feels out of reach, leave it to the professionals!
Mixbook has tons of themes for you to choose from. Follow the theme completely or use it as a starting point and make whatever tweaks you want.
2. Remember: Less is more.
With photos, text, stickers and other design elements, I strongly believe that less is more.
While it can be fun to add lots of stuff to your book, you want to be able to appreciate the important memories and not lose things in the busy-ness of your art project.
3. Culling baby photos is hard, so have a strategy.
How in the world are you supposed to narrow down all of the hundreds or thousands of photos you’ve taken of your kid in their first year to fit into a 20+ page book?
My strategy was to focus on photos that were attached to specific memories. So not just a photo where Baby C looked cute (cause that would be all of the photos!) but maybe one of her first time in the stroller or a funny interaction with our dog, Ellie.
I also prioritized photos of Baby C with friends and family. I think as we share this book with loved ones and eventually pass it down to Baby C, it’ll be even more special to see photos of her with loved ones.

4. Take advantage of not having any restrictions.
Unlike a traditional baby book, you don’t have to answer specific questions or only include one photo in the designated photo square when you design your own baby photo book.
Instead, you can get creative. Why not write letters to your baby each month instead of just tracking their height and weight?
Or include a whole 2-page spread of photos of baby with their grandparents, rather than just a single photo square.
5. Make photo books a lifelong tradition.
Creating a book for your baby’s first year is standard, but why stop there?
I love the idea of creating a photo book for each year of Baby C’s life. Like the old school photo albums my mom had of my childhood, I’d love to be able to pass on tangible memories to my daughter, rather than just pointing her towards a Google Drive.
Plus, I love the thought of spending time each year to sit down and design a photo book. Having the opportunity to go through the year and being reminded of all of our great memories sounds like the perfect recipe for gratitude.
And the perfect inspiration to make even more family memories the next year!
Click below to create your own baby photo book album and start your tradition of family photo books with my Mixbook discount code:
Please visit:
Our Sponsor